- Published on
WebSockets on Camel Quarkus
- Authors

- Name
- James Netherton
Apache Camel has always had great support for WebSockets. Historically, support has been split between components that provide a WebSocket Server and those providing the capability to produce / consume messages on externally hosted endpoints.
The Vert.x WebSocket component combines both approaches and provides functionality to:
- Expose a WebSocket server consumer
- Producer to send messages to locally connected server peers
- Producer to send messages to a remote WebSocket
- Consumer to act as a client on a remote WebSocket
What follows is a demonstration of how to configure a WebSocket server and interact with connected peers.
Camel Quarkus Vert.x WebSocket Chat Server
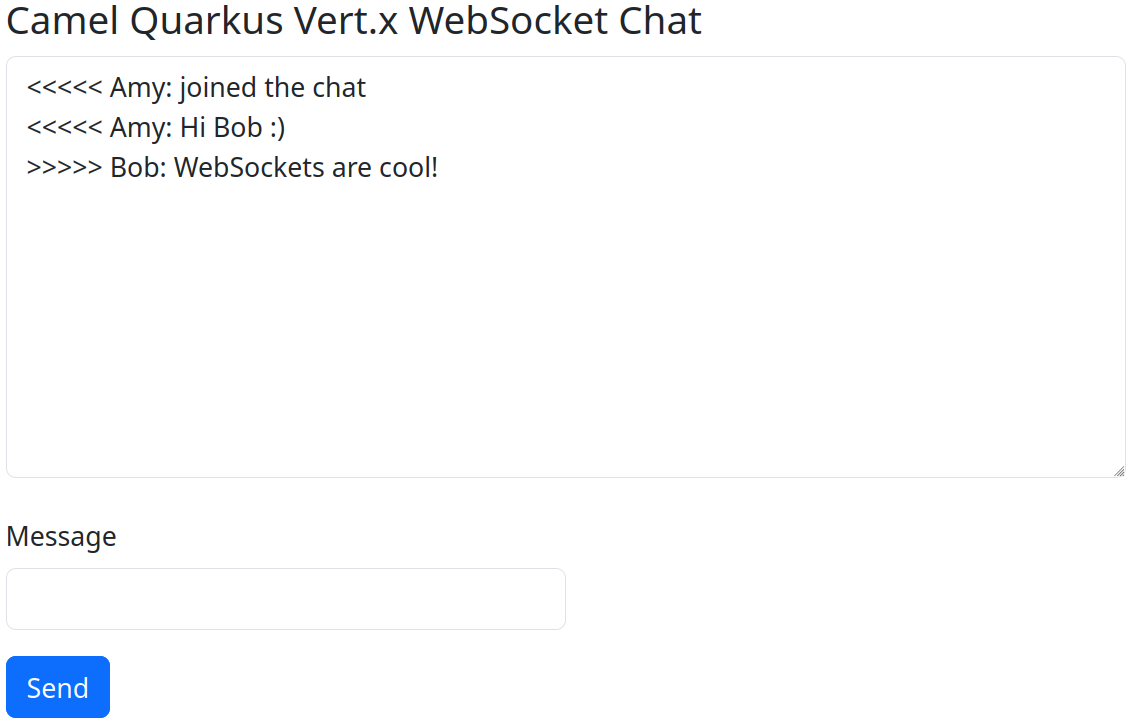
The theme for the demo application is a chat server. A web UI will enable users to enter their user name, connect to the chat room and send / receive messages. To do this, we'll configure some Camel routes to track each user 'session', detect connect / disconnect events and broadcast new messages to connected peers.
The source code for this blog post is located here.
https://github.com/jamesnetherton/camel-quarkus-demos/tree/main/vertx-websocket-chat
Configuring the WebSocket Server
To set up a WebSocket server, use the vertx-websocket endpoint scheme with from. For example.
from("vertx-websocket:/chat/{userName}?fireWebSocketConnectionEvents=true")
This will configure a WebSocket handler for paths matching /chat/{userName}. Where userName is parameterized so that we can capture the names of users connecting to the server. Notice that there's no host or port configuration. With Camel Quarkus, the underlying HTTP sever is managed by Quarkus, so its host and port configuration is inherited automatically.
Finally fireWebSocketConnectionEvents=true allows individual WebSocket events to be handled like open, close, message and error.
Handling WebSocket events
With the server consumer configured, we can handle the different WebSocket events with the Camel choice EIP. For example.
.choice()
    // Capture OPEN events to track newly connected peers
    .when(simple("${header.CamelVertxWebsocket.event} == 'OPEN'"))

    // Capture MESSAGE events sent from connected peers
    .when(simple("${header.CamelVertxWebsocket.event} == 'MESSAGE'"))

    // Capture CLOSE events to track peers disconnecting
    .when(simple("${header.CamelVertxWebsocket.event} == 'CLOSE'"))
Tracking peer sessions
We want to track peers connecting and disconnecting to the chat server. Each connected peer is assigned a 'connection key' which is just a UUID string. It can be used to maintain a map of users. There is a SessionManager bean for this.
@Singleton
public class SessionManager {
    private final Map<String, String> SESSIONS = new ConcurrentHashMap<>();

    public void startSession(String userName, String connectionKey) {
        SESSIONS.put(userName.toLowerCase(), connectionKey);
    }

    public void endSession(String userName) {
        SESSIONS.remove(userName.toLowerCase());
    }

    public String getConnectionKey(String userName) {
        return SESSIONS.get(userName.toLowerCase());
    }

    public boolean isSessionExists(String userName) {
        return SESSIONS.containsKey(userName.toLowerCase());
    }
}
When a new chat peer connects, we need to check if the chosen user name is already taken. And if so, close the WebSocket connection. Otherwise we start tracking their chat session.
When the WebSocket server consumer endpoint was configured above, we used the parameterized path /chat/{userName}. We can retrieve the value of the userName parameter from exchange headers like message.getHeader("userName", String.class).
The message body is set to a String that will be broadcast to all connected chat peers. This is done with sendToAll=true on the vertx-websocket producer.
.when(simple("${header.CamelVertxWebsocket.event} == 'OPEN'"))
.process(exchange -> {
    Message message = exchange.getMessage();
    String userName = message.getHeader("userName", String.class);
    if (!sessionManager.isSessionExists(userName)) {
        String connectionKey = message.getHeader(VertxWebsocketConstants.CONNECTION_KEY, String.class);
        sessionManager.startSession(userName, connectionKey);
        message.setBody("<<<<< " + userName + ": joined the chat");
    } else {
        ServerWebSocket webSocket = message.getBody(ServerWebSocket.class);
        webSocket.close((short) 1000, "SESSION_ALREADY_EXISTS");
    }
})
.to("vertx-websocket:/chat/{userName}?sendToAll=true")
When a peer disconnects from the chat server. We end their session and notify other connected peers.
.when(simple("${header.CamelVertxWebsocket.event} == 'CLOSE'"))
.process(exchange -> {
    Message message = exchange.getMessage();
    String userName = message.getHeader("userName", String.class);
    String connectionKey = message.getHeader(VertxWebsocketConstants.CONNECTION_KEY, String.class);
    String userConnectionKey = sessionManager.getConnectionKey(userName);
    if (!connectionKey.equals(userConnectionKey)) {
        message.setBody(null);
        return;
    }

    if (sessionManager.isSessionExists(userName)) {
        sessionManager.endSession(userName);
        message.setBody("<<<<< ${header.userName} left the chat");
    }
})
.to("vertx-websocket:/chat/{userName}?sendToAll=true")
Finally, we need to capture messages sent to the chat server and broadcast them all to connected peers.
.when(simple("${header.CamelVertxWebsocket.event} == 'MESSAGE'"))
    .setBody().simple("<<<<< ${header.userName}: ${body}")
    .to("vertx-websocket:/chat/{userName}?sendToAll=true")
Web UI
Build and run the application.
mvn clean package
java -jar target/quarkus-app/quarkus-run.jar
To view the chat UI, browse to http://localhost:8080. Enter a user name, connect to the chat server to start posting messages. You can open a second browser window and choose a different user name to simulate a conversation.

Further steps with Camel Quarkus Vert.x WebSocket
The demo application did not cover 2 other features. Producing messages to an external WebSocket or connecting as a client on an existing WebSocket.
Producing messages to an external WebSocket
The camel-vertx-websocket component considers an 'external' WebSocket one that is not managed by its own server consumer. We can test producing messages by starting a local WebSocket server with websocat on port 8000.
websocat -s 8000
We can test producing messages with vertx-websocket with a route like this.
from("timer:sendToWebSocket?period=5s")
    .setBody().constant("Hello World!")
    .to("vertx-websocket:ws://localhost:8000);
Every 5 seconds the String 'Hello World' will be sent to the local WebSocket endpoint. You'll see this echoed to the console by websocat.
Consuming messages received on an external WebSocket
vertx-websocket enables you to connect to a WebSocket and consume any messages that are received. To do this, use the consumerAsClient option on the consumer endpoint.
from("vertx-websocket:ws://localhost:8000?consumeAsClient=true")
    .log("WebSocket message: ${body}");
The route can be tested by sending some messages to the websocat server.
echo 'Hello Camel Quarkus Vert.x WebSocket' | websocat ws://localhost:8000
In the console output for the Camel Quarkus application you'll see WebSocket message: Hello Camel Quarkus Vert.x WebSocket.
Conclusion
Hopefully this brief overview of the Camel vertx-websocket component is helpful in showing how some of the basic functionality works.
Check out the component documentation for more information.
Happy coding!